Intro
This tutorial is intented for newbies who wanna code c64 assembler for the first time, aswell as oldies who want to get it freshened up after years of lameness... I will try to write it as softcore/easy as possible, so everyone should have a chance to try out the magical world of C64 machine code/assembler.

If you get hooked and want to learn more I can recommend the chapter "Basic to Machine Language" from the good old C64 Programmers Reference Guide, which can be found online right here on C64.CH
First of all, to give the newbies an idea of what machine code is, let me quote the mentioned C64PRG. (You can skip it if you think you know what it's about)...
What is Machine Language?
At the heart of every microcomputer, is a central microprocessor. It's a very special microchip which is the "brain" of the computer. The Commodore 64 is no exception. Every microprocessor understands its own language of instructions. These instructions are called machine language instructions. To put it more precisely, machine language is the ONLY programming language that your Commodore 64 understands. It is the NATIVE language of the machine.
If machine language is the only language that the Commodore 64 understands, then how does it understand the CBM BASIC programming language? CBM BASIC is NOT the machine language of the Commodore 64. What, then, makes the Commodore 64 understand CBM BASIC instructions like PRINT and GOTO? To answer this question, you must first see what happens inside your Commodore 64. Apart from the microprocessor which is the brain of the Commodore 64, there is a machine language program which is stored in a special type of memory so that it can't be changed. And, more importantly, it does not disappear when the Commodore 64 is turned off, unlike a program that you may have written. This machine language program is called the OPERATING SYSTEM of the Commodore 64. Your Commodore 64 knows what to do when it's turned on because its OPERATING SYSTEM (program) is automatically "RUN."
The OPERATING SYSTEM is in charge of "organizing" all the memory in your machine for various tasks. It also looks at what characters you type on the keyboard and puts them onto the screen, plus a whole number of other functions. The OPERATING SYSTEM can be thought of as the "intelligence and personality" of the Commodore 64 (or any computer for that matter). So when you turn on your Commodore 64, the OPERATING SYSTEM takes control of your machine, and after it has done its housework, it then says:
READY.
The OPERATING SYSTEM of the Commodore 64 then allows you to type on the keyboard, and use the built-in SCREEN EDITOR on the Commodore 64. The SCREEN EDITOR allows you to move the cursor, DELete, INSert, etc., and is, in fact, only one part of the operating system that is built in for your convenience. All of the commands that are available in CBM BASIC are simply recognized by another huge machine language program built into your Commodore 64. This huge program "RUNS" the appropriate piece of machine language depending on which CBM BASIC command is being executed. This program is called the BASIC INTERPRETER, because it interprets each command, one by one, unless it encounters a command it does not understand, and then the familiar message appears:
?SYNTAX ERROR
READY.
Okay, so now you know that... But how do we type in the code? There's basicly these alternatives: A machine code monitor, an assembler and a cross-assembler. A machine code monitor is a little program built into cartridges like The Final Cardridge and Action Replay which lets you write machine code and examine code from other programs, like demos. An assembler is like a machine code monitor, just with some extra features which makes it much easier to write big programs. The disadvantage is that it eats up quite a few valuable bytes in the computer (typically about half the mem) so it's not ideal for memory intesive effects. A solution for this problem is to use a cross-assembler which is placed in another computer (a PC for example) which is connected to the c64 via a special cable to transfer the raw machine code.
Machine Code Monitors
This is IMHO the best way to learn machine code, since you can easily see what's going on in the machine. The first thing you need to get started is a cartridge with an MC-mon (I use The Final Cartridge 3.) If you're using an emulator all you need to do is download a cardridge file, and attach it to the emu. For example in Vice select file -> attach cartridge image -> CRT file, and select the file... You can download The Final Cartridge 3 here. Remember to reset the emu to make it work (alt-r in Vice).
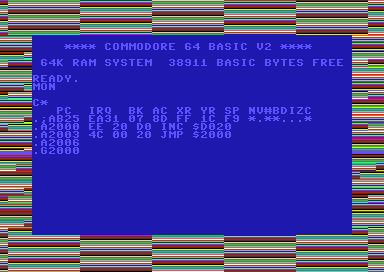
Now, let's begin the fun by typing MON. Then some strange stuff appears, and you're ready to go. Okay, time for our 1st piece of code (finally!) Type this:
.A2000 INC $D020
.A2003 JMP $2000
"A2000" means "Assemble from address 2000 (hex)". All addresses and numbers are hex numbers, but more about that in a little while. The address could have been any other from $0000 to $FFFF, but be careful, cuz some of them are reserved for other purposes, so until further notice we better stay within $1000-$9FFF. After you press return on each line some weird numbers and letters appear on the line, and the code you entered is moved to the right. Don't worry, that's the way it s'posed to be! ".A2003" should also appear automaticly, so there's no need to type that yourself. After the last line ".A2006" appears, just press return here to exit the assembly mode, and type the magic command G2000 (means "goto address 2000") to start... If everything went well you have now made your first machine code program: flickering border color ... Woah!...

Whenever you feel you have enjoyed it enuff, you can stop it by pressing Run/Stop+Restore or if you're on emulator it's Esc+Page Up (atleast on Vice.) Alternatively you can also reset the computer. Remember to start the mon again.
Hex Numbers
Okie dokie, time to explain a bit of what's going on. The weird numbers in the MC-mon are called hex numbers, and the advantage of 'em is that it's easy to translate between binary numbers (0's and 1's) and hex numbers, since a hex digit equals 4 bits. While normal numbers (aka decimal numbers) are based on 10 digits (0-9), hex numbers have 16 (0,1,2,3,4,5,6,7,8,9,a,b,c,d,e,f). This means that the numbers from a-f have the values from 10-15, and 10 in hex means 16. Confused? Then you can play around with the numbers in the mon by typing any 4-digit hex number like $C74F or $0003 and get the corresponding decimal number, and vice verca. Remember to preceed hex numbers by a $-sign and decimal numbers by a #. You can also play with 'em in the windows calculator, in scientific mode. Here you don't need $'s and #'s, you can just press hex and dec. Also note that you don't need $-signs before hex numbers in mon-commands like A2000, G2000, etc.
Here's a little table that might clear things up a bit...
| Decimal | Hex | Binary |
| 0 | 00 | 00000000 |
| 1 | 01 | 00000001 |
| 2 | 02 | 00000010 |
| 3 | 03 | 00000011 |
| 4 | 04 | 00000100 |
| 5 | 05 | 00000101 |
| 6 | 06 | 00000110 |
| 7 | 07 | 00000111 |
| 8 | 08 | 00001000 |
| 9 | 09 | 00001001 |
| 10 | 0A | 00001010 |
| 11 | 0B | 00001011 |
| 12 | 0C | 00001100 |
| 13 | 0D | 00001101 |
| 14 | 0E | 00001110 |
| 15 | 0F | 00001111 |
| 16 | 10 | 00010000 |
| 17 | 11 | 00010001 |
| 18 | 12 | 00010010 |
| 32 | 20 | 00100000 |
| 64 | 40 | 01000000 |
| 128 | 80 | 10000000 |
| 255 | FF | 11111111 |
For any Comments or Questions please contact us.

